
There is something quietly lovely about receiving a card that someone made by hand. In a world where messages arrive in seconds and disappear just as quickly, a handmade greeting card feels personal, warm, and a little more thoughtful. It does not have to be perfect. In fact, the charm often comes from the small uneven edges, the handwritten words, and the sense that someone sat down, chose the paper, arranged the design, and made something just for one person.
Learning how to make handmade greeting cards is less about becoming an expert crafter and more about enjoying the process. You can keep it simple with colored paper and a pen, or you can build layered designs with ribbons, pressed flowers, stamps, paint, and textured details. The beauty of handmade cards is that they can match any mood, occasion, or personality.
Why Handmade Greeting Cards Feel So Special
A handmade card carries emotion in a way that a store-bought card sometimes cannot. It shows time, attention, and care. Even a very simple card can feel meaningful because it has been made with a person in mind. Maybe the colors remind you of them. Maybe the message includes a private joke. Maybe the design reflects something they love, like flowers, books, music, pets, travel, or soft pastel shades.
Handmade cards also allow you to step away from generic wording. You do not have to rely on a printed message that sounds close enough. You can write something honest and personal, whether it is sweet, funny, comforting, or emotional. That personal touch is what turns a piece of paper into a keepsake.
There is also a calming side to card making. Cutting paper, arranging small details, and choosing colors can feel almost therapeutic. It gives your hands something creative to do, and it gives your mind a break from screens and daily noise.
Choosing the Right Materials for Your Card
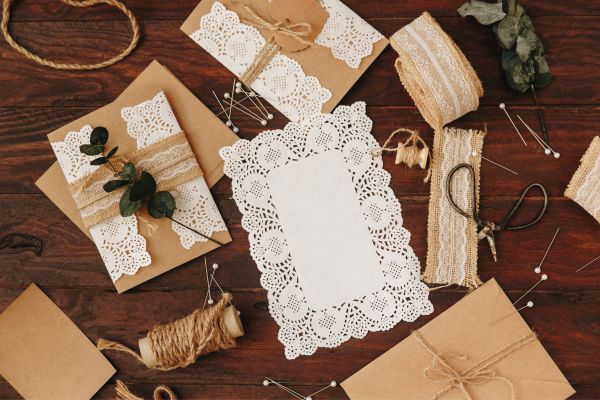
You do not need a large craft collection to begin. A good handmade greeting card can start with a few basic supplies: cardstock, scissors, glue, markers, and some decorative paper. Cardstock works better than ordinary paper because it is thicker and holds its shape nicely. White, cream, kraft brown, black, and pastel cardstock are all useful starting points.
For decorating, you can use whatever you already have around the house. Wrapping paper scraps, old magazines, leftover ribbon, buttons, stickers, lace, fabric pieces, dried leaves, and even brown packaging paper can become part of your design. Many beautiful handmade cards are made from simple recycled materials.
If you enjoy drawing or painting, watercolor paints, brush pens, fine liners, and colored pencils can help you create soft illustrations. If you prefer neat patterns and clean designs, paper punches, stamps, washi tape, and stencils can make the process easier. The main thing is to choose materials that feel comfortable and enjoyable to use.
Planning the Design Before You Start
Before cutting and gluing, it helps to think about the occasion and the person receiving the card. A birthday card might feel bright and playful, while a sympathy card should usually feel gentle and calm. A thank-you card can be simple and elegant, while a wedding card may suit soft colors, floral details, or a touch of shimmer.
Start by choosing the mood. Do you want the card to feel cheerful, romantic, cozy, modern, vintage, or minimal? Once you know the mood, pick two or three main colors. Too many colors can make the card feel busy, especially if you are new to card making. A soft color palette often works beautifully: blush pink and cream, navy and gold, sage green and white, or kraft brown with black ink.
You can lightly sketch the layout on a scrap piece of paper first. Think about where the main message will go, where the decoration will sit, and how much empty space you want to leave. Empty space is not wasted space. It gives the design room to breathe and makes the card look more polished.
Creating a Simple Folded Card Base
The card base is the foundation of your design. Take a piece of cardstock and fold it neatly in half. For a cleaner fold, use the back of a butter knife, a ruler edge, or a bone folder if you have one. Press along the fold slowly so the card sits flat.
A classic rectangular card is always a safe choice, but you can also experiment with square cards, tall narrow cards, or small note-card styles. If you want a layered look, cut a slightly smaller piece of decorative paper and glue it to the front of the folded card. This creates an instant background and makes even a simple card look more finished.
Keep the base strong, especially if you plan to add heavier decorations like buttons, fabric, or layered paper flowers. A flimsy base can bend under the weight, so thicker cardstock is helpful for more detailed cards.
Adding Handmade Details That Bring the Card to Life
Once the base is ready, the fun part begins. You can decorate the front in many ways, depending on your style. A hand-drawn flower, a small watercolor wash, a paper heart, or a strip of patterned paper can completely change the feel of the card.
Layering is one of the easiest ways to make a card look thoughtful. For example, place a small rectangle of patterned paper on the card, then add a plain label shape over it with your message. You can raise one layer slightly using foam tape or folded paper pieces to create a gentle 3D effect.
Texture also makes handmade cards more interesting. A piece of twine tied around the front, a torn paper edge, a small fabric patch, or a pressed flower can add depth. Torn edges are especially charming because they feel natural and artistic without needing perfect cutting skills.
If you like a cleaner style, keep the design minimal. A white card with one small painted flower and a handwritten message can look beautiful. Sometimes the simplest designs feel the most elegant.
Creative Ideas for Different Occasions
For birthdays, you can use bright paper, balloons, candles, confetti shapes, or cheerful lettering. A small handmade cake illustration or layered paper gift box can make the card playful without looking too complicated.
For thank-you cards, softer designs work well. Try leaves, flowers, simple borders, or warm earthy colors. A handwritten “thank you” in the center with a small decorative corner can be enough.
For anniversaries or romantic cards, hearts are classic, but they do not have to feel ordinary. You can cut hearts from old book pages, watercolor paper, or fabric scraps. You can also create a simple line drawing of two hands, two cups of tea, or a small scene that feels personal.
For friendship cards, choose details connected to shared memories. Maybe a little coffee cup, a travel map piece, a favorite quote, or a tiny doodle that only your friend would understand. These small personal references often mean more than a perfectly polished design.
For holiday cards, handmade touches feel especially warm. Snowflakes, stars, leaves, candles, ornaments, or simple festive patterns can all work. Natural materials like kraft paper, twine, and dried orange slices can create a cozy seasonal feel.
Writing a Message That Feels Personal
The message inside the card matters just as much as the design outside. Many people get stuck here, worrying that their words will sound too plain or not emotional enough. But a simple, honest message is usually better than something overly dramatic.
Think about what you truly want the person to feel. Appreciated? Celebrated? Comforted? Remembered? Start there. You might write about a specific memory, a quality you admire, or a wish for them. Instead of saying only “Happy birthday,” you could add a sentence about how much their kindness, humor, or presence means to you.
Handwriting makes the card more intimate, even if your handwriting is not perfect. Write slowly, and use a pen that does not smudge. If you are nervous, draft the message on scrap paper first. This helps you avoid spelling mistakes and gives you confidence before writing inside the final card.
Avoiding Common Card-Making Mistakes
One common mistake is adding too many decorations. It is tempting to use every pretty sticker, ribbon, and paper scrap at once, but a crowded card can lose its charm. Choose a main feature and let the rest support it.
Another mistake is using too much glue. Wet glue can wrinkle paper or leave marks, especially on thin materials. Use a light layer and allow it to dry fully before handling the card too much. Glue sticks, double-sided tape, and small dots of craft glue are often easier to control.
It is also worth checking the card size before decorating. If you plan to mail it, make sure it fits into an envelope and is not too thick. A card with large buttons or bulky flowers may look lovely, but it might be difficult to post.
Finally, do not worry too much about perfection. Handmade work naturally has small irregularities. A slightly uneven cut or a tiny paint mark does not ruin the card. It often makes it feel more human.
Making Handmade Cards More Sustainable
Handmade greeting cards can be a wonderful way to reuse materials. Old calendars, fabric scraps, gift bags, packaging paper, magazines, and leftover wrapping paper can all become beautiful card elements. Even small offcuts from previous craft projects can be saved for borders, shapes, and layered details.
Pressed flowers and leaves are another lovely option, especially if you enjoy natural designs. Place them carefully and use only a small amount of glue. They create a delicate, organic look that feels timeless.
You can also make envelopes from recycled paper or decorate plain envelopes with matching details. A small stamp, doodle, or strip of washi tape on the envelope makes the whole card feel more complete.
Turning Card Making Into a Relaxing Creative Habit
Once you understand how to make handmade greeting cards, it can become more than a one-time craft. You might start keeping a small box of supplies ready for birthdays, thank-you notes, and last-minute occasions. Having a few blank card bases prepared can save time and make spontaneous card making easier.
You can also create cards in batches. Choose one design style, then make several versions in different colors. This works well for holiday cards, invitations, or thank-you notes. Each card can still feel personal with a handwritten message inside.
The more you make, the more your style will develop. You may discover that you love soft watercolor florals, bold paper cutouts, vintage collage, minimal line art, or playful cartoon-like drawings. There is no right style. The best handmade cards are the ones that feel like you.
Conclusion
Handmade greeting cards remind us that small gestures still matter. They do not need expensive materials, advanced skills, or perfect designs. What they need is thought, care, and a little creative attention. Whether you are making a birthday card, a thank-you note, a holiday greeting, or a simple message for someone you miss, the handmade touch gives it warmth.
Learning how to make handmade greeting cards is really about slowing down and creating something personal. A folded piece of cardstock, a few colors, a kind message, and your own hands can turn an ordinary greeting into something memorable. And sometimes, that is exactly what makes a card worth keeping.